
Guy is still away, but he comes back tomorrow night. He's been gone six weeks and I had hoped I might fade away, but I must have kept up the calorie intake - I still look the same!!
On Saturday the 26th of September there was an alternative photographic techniques exhibition and demonstrations at Le Murate.
The photo above is of the cyanotype demonstration held in the square near Le Murate (they needed a big open sunny space to expose the positive film).
Le Murate covers the whole block between Via Ghibelline and Via dell'Agnolo and it's not far from the historic centre of Florence. It opened in 2011 and is a complex which includes public housing, parking, shops, restaurants bars and open spaces. There is a cafe there called "Caffe Letterario Le Murate" where you can meet friends for wine or coffee, hear live music, view exhibitions, poetry readings and they have a newsletter in which they email out the coming program.
Le Murate was originally built as a convent in 1424 for the Benedictine nuns who were voluntarily "walled up" for their religious life - hence the name Le Murate. The cells are still there, but the doors are sealed shut. In the years when Napoleon ruled Florence, the nuns were sent packing and Le Murate became a prison, remaining so from 1808 to 1985. In 1998 it was decided to use the space for the people and has been a very successful use of the space.
I hadn't been there before, but when Guy comes back we will definitely walk over and see what's happening.
When Lourdes and I arrived everyone was running to the square near Le Murate to lay out a large sensitised sheet on which they had placed a large positive image on what looked like panels of plastic sheeting - everyone unrolled it and held the edges flat for about 15 minutes and then it was bundled up and taken back into Le Murate to be washed and hung out to dry. Their handprints all became part of the final print.
 |
| Cyanotype drying |
They held a couple of demonstrations of alternative photographic techniques, albumin printing and a few others, but it was in rapid Italian so I listened for a bit, got lost and just looked at the exhibition of photographs and old cameras.
We met up with Nino and Giulio and Nino's friend Vincenzo as we decided to go to another print exhibition being held at a hotel nearby at 5pm ( the girl who made the prints is a friend of Giulio's from University). We all had coffee at the cafe and left for the exhibition. The exhibition was OK, but the food and drink was great! Apparently you can eat your way around Florence attending exhibition openings - nice not to have to buy or cook dinner!
Lourdes lives just around the corner from us so we walked home together as I had to go on my first Prato tour of the autumn on Sunday morning. I told Nino that I was going to Prato on Sunday and all he said was "auguri" (congratulations). People in Florence don't have a high opinion of Prato - they just see it as full of Chinese factories. Most of them haven't even been to the historical centre and don't know it exists.
Lourdes lives just around the corner from us so we walked home together as I had to go on my first Prato tour of the autumn on Sunday morning. I told Nino that I was going to Prato on Sunday and all he said was "auguri" (congratulations). People in Florence don't have a high opinion of Prato - they just see it as full of Chinese factories. Most of them haven't even been to the historical centre and don't know it exists.
 |
| Lourdes and Giulio at Le Murate |
 |
| The courtyard and cafe at Le Murate |
On Sunday I was up early to get to the station by 9am to meet up with the tour. These are the same free tours that we did in the spring. This one was called "Noble Villas & A Tour Of The Historical Centre Of Prato"
The other tours we did before the holidays probably had half Italian speaking and half English speaking people and only had about 20 people attended. This tour had 40 people and only 2 of us spoke English! So the word must have got around about how good the tours are. The other English speaker was Paula who is a retired nurse from Minnesota (maybe my friend Mary knows her??). Paula has been living here for 3 months and is just down the street from our apartment.
Anyway, Paula and I had Violetta (the guide who spoke English) all to ourselves.
The first stop was the Castle Castello dell'Imperatore. This is virtually in the middle of suburbia and is quite spectacular.
The castle was built by the King of Sicily Frederick 2nd, Holy Roman Emperor between 1237 and 1247 on top of a previous fortification - of which 2 towers still remain. When he died, they stopped building it and it has been used for all sorts of things over the last few hundred years. It has been an open air theatre in the summer and last time we were there it was a concert venue for a very loud rock concert.
It is a ruin, but it is free to visit and you can climb up to the ramparts and have a beautiful view over the church and the square.
 |
| Inside the castle |
 |
| Outside the castle |
We then walked around the historical part of Prato with the guide telling everyone about the history of Prato - I wish I could keep up with spoken Italian because I am sure it was fascinating. I think Paula and I got the edited version! I had already seen this part of Prato on previous tours.
There were many people in the square this time because there was an exhibition of vintage cars.
There were many people in the square this time because there was an exhibition of vintage cars.
 |
| My new car! |
Violetta and Sylvia had booked everyone into a small restaurant for lunch, which was OK but a bit expensive for what we ate - maybe I should have drunk the wine and had the lampredotto (cow's stomach) .
There was a small craft market and exercise expo, but we were the only people there - maybe more turned up later.
We then headed back to the bus and went out of the main centre and were taken in small group in, of all things, ambulances(!!!) up to a small village called Montemurlo on the outskirts of Prato where there is a big fort situated on the top of a big hill. I am not sure why they used ambulances - maybe because the road was very steep and there was nowhere to park the bus?
It is in a very strategic position as you can see for long distances, so in Roman and Medieval times they would be prepared if invasion was threatened.
We visited a church which is a private church owned by a family who owns most of the part of the village we were visiting. This church has a crucifix inside which was apparently stolen and dropped by the thieves in the river while they were being chased. The crucifix was not found until a farmer noticed his cows kneeling and praying by the river, so over he went and found the crucifix!!
There was also story about a man going into the church where there is a fresco of the Virgin Mary, apparently the figure of Mary stepped out of the fresco and stood in front of him.
There was also story about a man going into the church where there is a fresco of the Virgin Mary, apparently the figure of Mary stepped out of the fresco and stood in front of him.
Lots of miracles here in Italy.......
 |
| Inside the church |

 |
| The famous crucifix |
We were then taken to see a beautiful villa. The owner has restored the villa, but doesn't spend much time there. The gardens were gorgeous - we walked around and then the caretaker showed us around the bottom floor which is a wine cellar and workshop. I would liked to have seen inside the villa but it is not open to the public.
 |
| The Villa |
 |
| Front garden |
 |
| Wine cellar |
 |
| Workshop in wine cellar |
 |
| View over the valley looking at the factories. |
Then it was back into the ambulances and back to the bus and then back to Florence.
Printmaking
If you are not a printmaker you will find the next part really boring!!
In the last post, I wrote that I hoped I would be starting multi plate colour etching.
Well, I have started and when I started I was the only one doing it. Now Federico and Giulio have also started, but I am way ahead of them - thank goodness, as it is really complicated.
It would be terrible if there were 3 of us fumbling around in the dungeon studio (when people ask where I am, they are told SOTTO) - it's pretty small and dark and full of mosquitoes - luckily they don't like me (the mosquitoes, not the other students!)
The printmaker who has formulated this process is Professor Sweitlan Nicholas Kraczyna. Nicholas has lived in Florence for over 50 years and was one of the original founders of Il Bisonte. He was the Director at Il Bisonte but has retired and now teaches students from Sarah Lawrence University (a private American University which has a campus in Florence) and also students from the Florence campus of Syracuse University.
It is too complicated to explain the whole process, so I won't even try. I will just give you an abbreviated version of all the work I have had to do in the last 2 weeks so you will feel sorry for me and marvel at the results!
The main point is that by using 3 plates with the primary colours inked on them (Yellow, Red and Blue) you can make over 100 hundred colours, using different times of aquatint and different mixes of ink (that is, by mixing different amounts of ink with transparent ink or white ink)
I am lucky because Valerie, a fellow student, has been working with Professor Kraczyna for the last 3 years and is writing a manual with him so anyone can use this process. Valerie has been a great help to me, explaining things I don't understand. The Professor also runs workshops at his studio near Lucca and Il Bisonte (that is, Manuel and Vincenzo) will probably run a seminar next year.
So if you want to learn how to do it, buy the manual when it comes out or learn Italian and come to the seminar next year. To learn the process takes about 4 weeks and I must admit it has taken me 2 weeks to get my head around it and I am still not quite sure!
- The first thing I had to do was make 3 zinc plates all the same size (16cm square). That means cutting them out, bevelling the edges, polishing the edges, rounding the corners, sanding them, degreasing them, polishing them and putting plastic on the back. In all it takes about 2 or 3 hours to do them. I have sped up - when I first came to Il Bisonte, it took me hours to do one small plate!

- Then I had to drypoint a matrix onto each plate and also put registration marks on the corners so I can line all the plates up when printing.
- Then I applied aquatint (it's a powdered rosin) to the three plates (and it has to be a good strong aquatint as the last line of the plate will be in the acid for 60 minutes). The acid used is 1:20 and a fresh solution is made up to use.
- I heated the aquatint, trying not to melt it too much or I would have to start again (guess what happened the first time?)
- I taped the edges using scotch tape and used a burnisher to flatten the edges so that the acid wouldn't leak through.
- I started putting the plates in the acid. The first row is covered (and I had to remember to burnish the edges of the tape each time), second row 15 seconds then covered, 3rd row 15 seconds (equals 30 seconds) and then covered and so on. The time doubles until the last row is in for 60 minutes. I did the 3 plates separately until I got to 4 minutes and then put them in as a group. It is very easy to become distracted, as it happens, I had to redo one of the plates when I finished - in fact I had to cut a whole new plate!!! The battery in my phone also went flat and it's hard to see the clock from the etching area.
- Next time I will take my IKEA timer with me.


 |
| Check sheet to keep track of the etching |
- I then had to print all the plates with black ink to see if they were correct (that's when I found I had to redo one of the plates)

- We then had to decide which plate would be which primary colour - I am still not sure how this decision is made. (whether it's the lightest aquatinted plate which becomes yellow, or the darkest). I have to have more discussion about that. So I had 3 plates; Red, Yellow and Blue. I had to scratch into the back of the plate the colour that it would be so I wouldn't get mixed up.
- I then had to set up the dungeon studio, keeping a separate work station for each colour so they don't become contaminated. Separate tarlatan, separate gloves, paper - everything!
 |
| Keeping the inks separate |
 |
| One workstation |
- The inks have to be Charbonnel inks, Primary Yellow (Giallo) Primary Red (Rosso) and Primary Blue (Blu). I also had to buy a tube of transparent ink and one of covering white ink.
 |
| Starting to add transparent ink |
- Yellow is a most difficult ink to use. I had to have tissue paper under the plate as newsprint will contaminate it. You can't wipe too hard or the ink oxidises and goes black. I had Manuel (the maestro) wipe the plate to show me how to do it. Each plate took about 15 minutes to wipe - actually wipe is the wrong word - DAB, DAB, DAB!
 |
| Manuel doing the yellow plate for me |
- The paper has to be white, and not too wet, not too dry (like Goldilock's porridge).
- I bought Magnani paper from the office - the Magnani paper mill has now started making paper again, but it has a lot of size in it and at first was like cardboard. It needs a lot of soaking, but it's not too bad.
- I've put in a photo of what the prints look like.
 |
| The print with the clearest colours- 1/2 Yellow, 1/2 red and 1/4 blue |
- There are a lot of combinations of prints that can be made from the plates.
- The next part of the process is to add transparent ink to the pure ink in different amounts, 1/2 pure ink +1/2 Transparent, 1/4 pure ink + 3/4 Transparent, 1/8 pure ink + 7/8 Transparent.
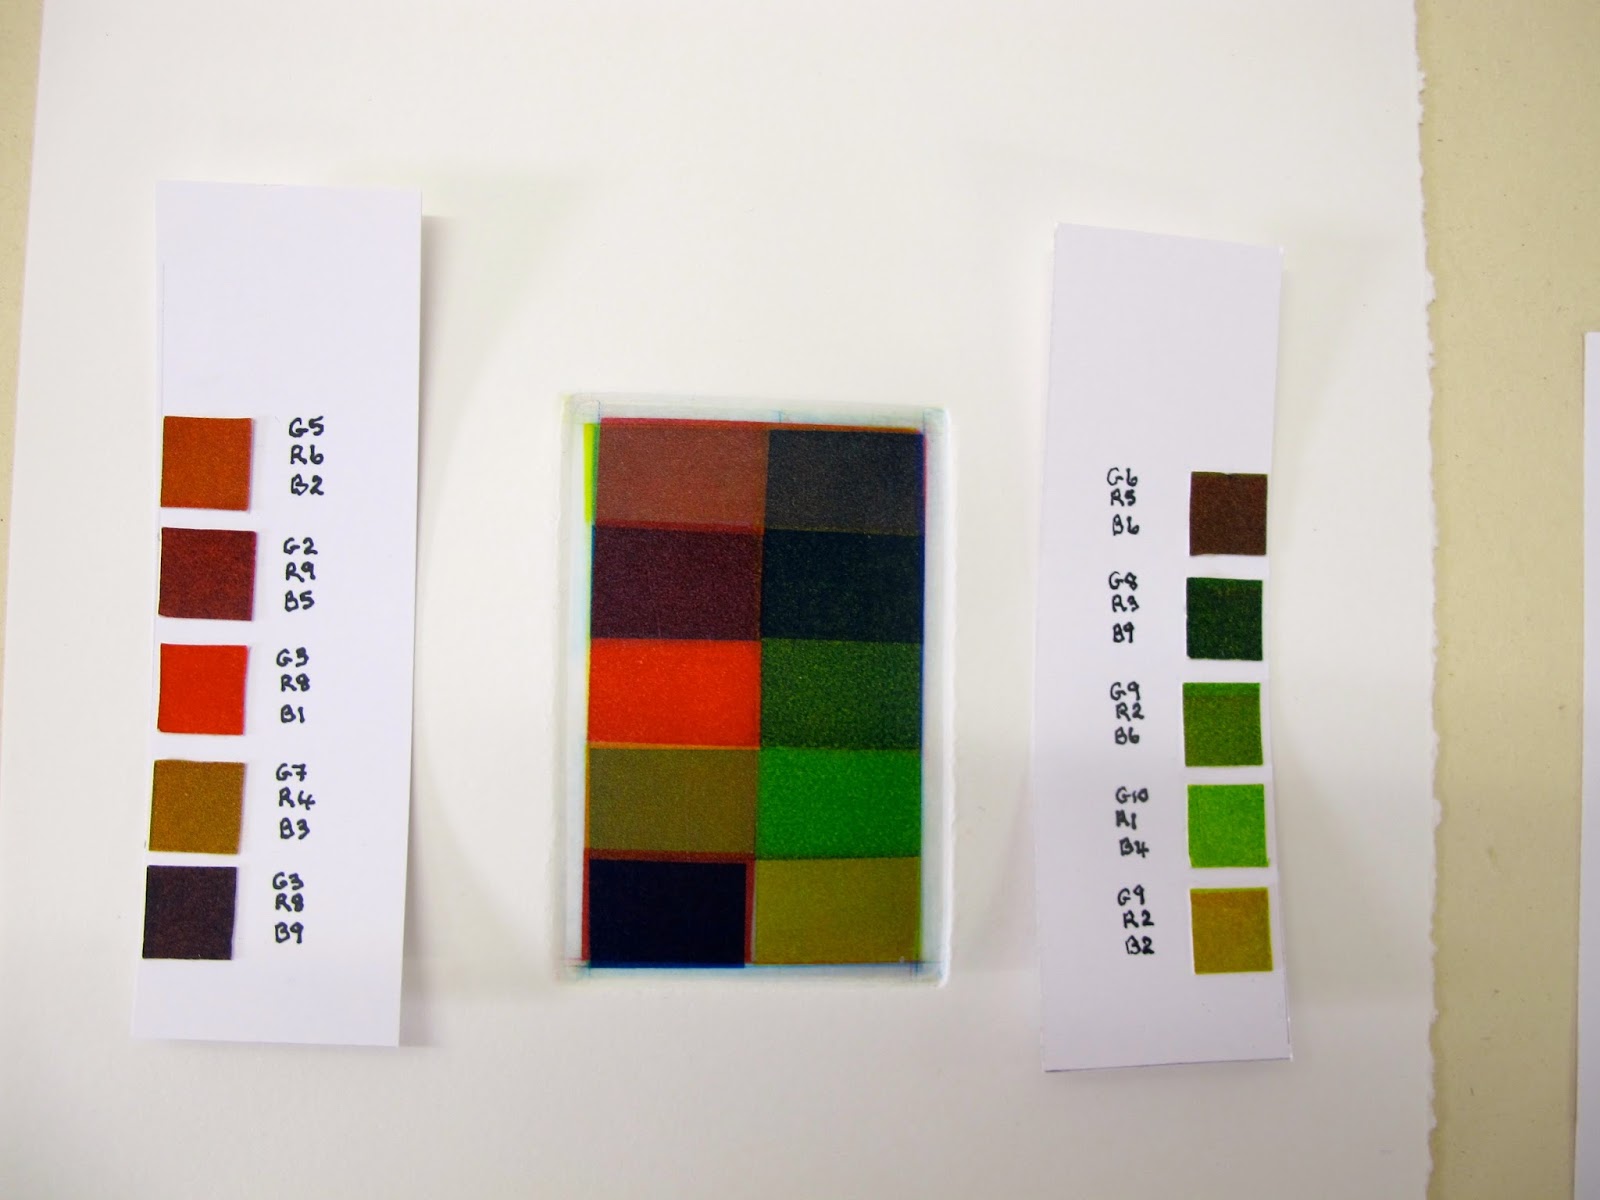
- The plates all have to be printed one on top of each other in all the possible combinations (and that's a lot!) After they are all done, I had to decide which print had the most different colours that you could see. I had to make 2 copies of this print as I was going to cut squares out of one of them. When you look at them all together they all look the same, but when you isolate each square it's surprising how many there are.
- I then had to write the ink formula for each square on the back of the print
- So after the best print is picked out I had to randomly cut out 10 small squares and note the formulas for each colour.
 |
| Random colours cut out of print |
 |
| Keeping track of how I made each colour |
- The next step is to repeat all of the above things I did with transparent ink, but using a mix of white covering ink. I thought yellow ink was difficult, compared to white, it's easy. White ink oxidises (goes black) just because you look at it! It can't be wiped, it has to be dabbed, it's sticky and difficult. The paper has to be damp, not wet, or it tears the paper. I now have a nearly full tube of white ink that I don't know if I will ever use - although some of the colours I made with it were beautiful.
- The next step was to make 3 more small plates exactly the same size as each other and divided into 10 squares. Each square would be where I would try and reproduce the colour of one of my little tiny squares. Are you still with me???
 |
| The three little plates |
 |
| I made 8 colours! |
 |
| The plates after printing and before cleaning |
- I then wrote the formulas and aquatinted the plates and etched the plates. A sign of success is if you get 8 of the 10 colours - and thank goodness I did get 8 colours!
So as of today I have many, many prints and a very sore back from all this work. The next step (next Monday) is to start the reduction exercise.
In this exercise I have to aquatint 3 plates the same size (I have repeated the 16cm square and prepared them today) and leave them in the acid for 60 minutes (when printed they should be a deep black). I will then have to print them all with black ink to decide which plate has the strongest aquatint to the weakest. The next step will be to burnish a design on the plate and then print onto paper and then each plate. So this weekend I suppose I better come up with a design! Simple is better as it is pretty complicated - although Manuel told me that it is "piu facile"!!! (easier) than the other exercises.
We will see............
Wow, what a process!
ReplyDelete